
Exterior One Point Perspective
[Animate]
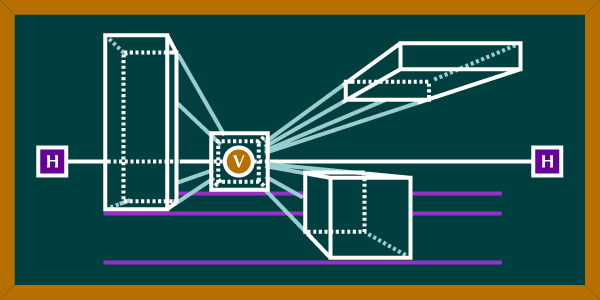
Convergence Lines are in light green, as well as construction lines of those areas that are obscured from view.
In the diagram above, you will notice that all the diagonals recede to the central vanishing point. In one point perspective all horizontals and verticals do not change. So a one-point perspective drawing can begin with simple squares and rectangles. Objects that are above the viewer's horizon line are viewed from underneath (they are above your eye level). Objects that are below the viewer's horizon line are viewed with their tops showing. Any object that straddles the horizon line, like the large object on the left, does not show top or bottom because these are obscured from the viewer. Remember that this system will only work if you are parallel and perpendicular (90 degree angles) to the objects that you are drawing.
Hint
If an object is directly in front of the vanishing point, only the front is visible and all sides are obscured.
As the number of convergence and other construction lines increase it may become necessary to erase portions to simplify the drawing. Remember that some ines will be concealed behind objects so they may not be necessary after the object is drawn.
Hint
Notice the purple lines that run horizontally along the bottoms of the objects at the bottom of the image. By using these lines, one can find approximate placements for other objects. If you have two or more objects that share a common horizontal (or vertical) you can align them easily by finding points and edges in common.
- After establishing a horizon line try drawing three squares. Place one above the horizon, one below, and one that overlaps. Then give them dimension by using convergences that all recede to the same vanishing point. In one-point perspective there is only ONE vanishing point.