
Plotting Grids in Perspective
[Stop Animation]
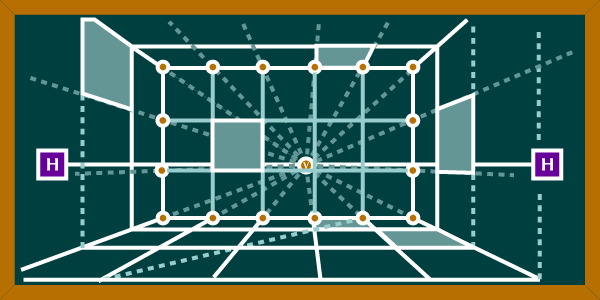
To draw grids using linear perspective, it is best to start with a square. The diagram above shows a perspective view of a room drawn in one-point perspective. After you have established a horizon line and a vanishing point follow this step by step procedure to create a gridded interior
Steps for Creating Grids in Perspective
- Begin by creating a square plane in perspective. Remember that when drawing objects in perspective trust your observation. You will find that when you look at a square in perspective it appears to be a very flat form in space.
- Make marks at equal increments across the bottom edge of the rear wall rectangle. You can use a ruler to mark off equal increments or any regular measurement that you choose (my diagram uses 50 points for each segment).
- Draw a line from the vanishing point through each point until it reaches the edges of your drawing area. Notice that the points where the lines meet the front edge of the drawing area are further apart than the points at the bottom of the rectangle edge.
- Draw a horizontal line across these lines indicating a row of tiles along the back edge of the square space that we are subdividing. This can be done through observation or by using the method used in creating a square in perspective
- Using the back right corner of the space as a starting point, draw a line from the back right corner through the front left corner of the small square and continue the line to the edge of the paper.
- Draw a horizontal line at each point that the diagonal crosses the radiating lines that subdivide the large square. This will create a grid pattern.
This grid system can be carried into walls and ceiling areas to create grids on all planes. This may make it possible to systematically place objects in a space by using the grid on all planes.